
For the subordinate (issuing) CA, that I have named PKI-Sub-CA-1, we have 5 primary tasks to complete:
- Create the capolicy.inf file and place it in %windir% or the C:\Windows folder.
- Install or "publish" the root CA's certificate and CRL in: a) the computer certificate store of the subordinate CA, b) Active Directory and c) on a web server.
- Install the ADCS role.
- Request a certificate from the root CA for the subordinate CA.
- Execute a post-install script.
I will now present these steps in greater detail (the first two in this blog post and the last three in the following post).
***
CAPOLICY.INF
First, this is the content of the capolicy.inf file that I have created for the subordinate (issuing) CA:
---
[Version]
Signature= "$Windows NT$"
[certsrv_server]
renewalkeylength=2048
RenewalValidityPeriodUnits=5
RenewalValidityPeriod=years
CRLPeriod = days
CRLPeriodUnits = 3
CRLDeltaPeriod = weeks
CRLDeltaPeriodUnits = 0
LoadDefaultTemplates=0
---
In summary, the key length is 2048 (the current minimum length recommended), the maximum validity period for certificates issued by this subordinate CA is 5 years (not to be confused with the length of the CA's certificate which is 10 years), the base CRL will be published every 3 days, there will be no Delta CRL and the default certificate templates will not be loaded (more about these templates later).
Publication of the root certificate and CRL
Second, the subordinate CA must trust the root CA. Since the root CA is offline, we have navigated to the following location...
---
[Version]
Signature= "$Windows NT$"
[certsrv_server]
renewalkeylength=2048
RenewalValidityPeriodUnits=5
RenewalValidityPeriod=years
CRLPeriod = days
CRLPeriodUnits = 3
CRLDeltaPeriod = weeks
CRLDeltaPeriodUnits = 0
LoadDefaultTemplates=0
---
In summary, the key length is 2048 (the current minimum length recommended), the maximum validity period for certificates issued by this subordinate CA is 5 years (not to be confused with the length of the CA's certificate which is 10 years), the base CRL will be published every 3 days, there will be no Delta CRL and the default certificate templates will not be loaded (more about these templates later).
***
Publication of the root certificate and CRL
Second, the subordinate CA must trust the root CA. Since the root CA is offline, we have navigated to the following location...
C:\Windows\System32\Certsrv\Certenroll
And copied the root cert and root CRL to removable media (this can be a floppy disk if you still have any, a USB drive or a virtual floppy disk in a virtual environment).
We then connect the media to the subordinate CA.
At that point, we must install or publish the root CA and CRL to the following locations:
- The subordinate CA's local computer certificate store (in particular, the "Trusted Root Certification Authorities" and "Intermediate Certification Authorities" folders).
- Active Directory
- At the HTTP URL designated in the AIA and CDP "Extensions" tab
Note: I will install the root certificate and root CRL to the subordinate CA manually. We could simply publish them to Active Directory instead and (if auto-enrollment is enabled in Group Policy), force the installation with the command gpupdate /force.
However, I will perform the manual install to demonstrate the process.
And once again, all these certificates and revocation lists must be available for:
- the building of a "chain of trust" reaching from the certificate issued to the end-user (or computer), to the issuing CA and, ultimately, to the root CA.
- revocation list verification (the revocation list must be available and consultable so revoked certificates are rejected).
I want to analyze the process and show the "before and after" status of the certificate store and Active Directory (with HTTP, it is simply a matter a copying the files in question to a folder).
First, the certificate store for the local computer. Since there is also a store for the user (each user of the computer in fact) we have to make sure we are targeting the certificate store for the server itself.
We can do this by creating a custom MMC for the "Certificates" snap-in or by adding the Certificates snap-in to an existing MMC. If you are not sure how to do this, I would suggest that you consult other sources, for example:
Creating a Console File (first part)
Note: with Windows 8, Windows 2012 Server (including R2), we can enter the following command in the "Run" box to open the certificate store for the local computer (server):
certlm.msc

--- Certificate Store (local computer) ---
Once we open the Certificates snap-in, we can see the folders described here (only the described folders play a role in our PKI).
This is the "personal" folder of the certificate store:

It is where certificates issued to the computer are stored. In the case of a root CA, it will issue itself a certificate. In the case of the issuing CA, we will have a certificate delivered by the root CA to the issuing CA with the name of the issuing CA on the certificate (illustrated in the next blog post).
In the "Trusted Root Certification Authorities" folder and the "Intermediate Certification Authorities" folder (Certificates subfolder), we have the certificates of various root authorities such as Thawte and Verisign that are shipped with the Windows operating system and trusted by default:


We also have a Certification Revocation List folder that currently holds a single revocation list:

We add the root CA's certificate to the locations above with the following command:
C:\> certutil -addstore -f Root C:\RootCertCRL\PKI-ROOT-CA_PKI-ROOT-CA.crt
Note: "C:\RootCertCRL\PKI-ROOT-CA_PKI-ROOT-CA.crt" is the path to the location where I copied the root CA's certificate on the subordinate CA.
Here is a screenshot of the command:

We add the root CA's CRL to the appropriate location above with this command:
C:\> certutil -addstore -f Root C:\RootCertCRL\PKI-ROOT-CA.crl
Now we can see the results in the following screenshots...
Our root CA's certificate is added to the Trusted Root Certification Authorities folder:

And also to the Intermediate Certification Authorities folder (no screenshot).
Furthermore, the root CA's CRL is added to the subordinate CA's Certificate Revocation List folder:

We can do this by creating a custom MMC for the "Certificates" snap-in or by adding the Certificates snap-in to an existing MMC. If you are not sure how to do this, I would suggest that you consult other sources, for example:
Creating a Console File (first part)
Note: with Windows 8, Windows 2012 Server (including R2), we can enter the following command in the "Run" box to open the certificate store for the local computer (server):
certlm.msc
--- Certificate Store (local computer) ---
Once we open the Certificates snap-in, we can see the folders described here (only the described folders play a role in our PKI).
This is the "personal" folder of the certificate store:
It is where certificates issued to the computer are stored. In the case of a root CA, it will issue itself a certificate. In the case of the issuing CA, we will have a certificate delivered by the root CA to the issuing CA with the name of the issuing CA on the certificate (illustrated in the next blog post).
In the "Trusted Root Certification Authorities" folder and the "Intermediate Certification Authorities" folder (Certificates subfolder), we have the certificates of various root authorities such as Thawte and Verisign that are shipped with the Windows operating system and trusted by default:
We also have a Certification Revocation List folder that currently holds a single revocation list:
We add the root CA's certificate to the locations above with the following command:
C:\> certutil -addstore -f Root C:\RootCertCRL\PKI-ROOT-CA_PKI-ROOT-CA.crt
Note: "C:\RootCertCRL\PKI-ROOT-CA_PKI-ROOT-CA.crt" is the path to the location where I copied the root CA's certificate on the subordinate CA.
Here is a screenshot of the command:
We add the root CA's CRL to the appropriate location above with this command:
C:\> certutil -addstore -f Root C:\RootCertCRL\PKI-ROOT-CA.crl
Now we can see the results in the following screenshots...
Our root CA's certificate is added to the Trusted Root Certification Authorities folder:
And also to the Intermediate Certification Authorities folder (no screenshot).
Furthermore, the root CA's CRL is added to the subordinate CA's Certificate Revocation List folder:
--- Active Directory ---
There are a number of locations in Active Directory where certificate information will be published. We can see them using the AdsiEdit.msc tool (target the configuration partition).
The AIA information will be published in the CN=AIA folder. This is the "before" view:

The CRL will be published in the CN=CDP folder:
The AIA information will be published in the CN=AIA folder. This is the "before" view:
The CRL will be published in the CN=CDP folder:

As a note, certificate templates will be created in this location (we'll see more about these templates later).

Lastly, CA certificates will be published here:

This is the command that we use to publish the root CA certificate into Active Directory:
C:\> certutil -dspublish -f C:\RootCertCRL\PKI-ROOT-CA_PKI-ROOT-CA.crt RootCA
When the RootCA option is used, the certificate is published to both the CN=AIA and the CN=Certification Authorities locations (click on images to enlarge):


As for the CRL, this command publishes the root CA CRL to Active Directory:
C:\> certutil -dspublish -f C:\RootCertCRL\PKI-ROOT-CA.crl
Note: you may have an error message here, something about an "UnavailableConfigDN". Like others, I thought that perhaps it is necessary to add the "RootCA" suffix at the end - as for the certificate command earlier. When I added "RootCA", the command completed successfully and published the CRL to this location:

However, this is not what we want. The subfolder should have the name of the CA, and we do not have a CA named "RootCA".
You will probably need to run this command:
certutil -setreg ca\DSDomainDN "DNpath"
Based on my example above, this would be:
certutil -setreg ca\DSDomainDN DC=machlinkit,DC=biz
If the command executes successfully, we would then attempt to publish the root CRL to Active Directory again.
Here's another discussion about this error:
UnavailableConfigDN
***
Now that the root CA certficate and CRL are available in Active Directory, they will be propagated via Group Policy to client computers without manual intervention. We can force this to happen immediately with the command gpupdate /force on a particular machine - or wait for around 90 minutes and let Group Policy update automatically.
--- HTTP Url on IIS web server ---
If we have clients that are not Active Directory domain members, we can make the certificates and CRLs available to these clients using a virtual directory on a web server. In this example, I will use IIS on a server named PKI-File-Svr1. In fact, we could opt to use IIS only, and not publish certificates to Active Directory at all. Indeed, nothing prevents Active Directory domain members from accessing a web share. However, I will use both methods, if only to demonstrate the implementation of each.
First, we need to create a shared folder on a server running IIS. Installing and configuring IIS in general is beyond the scope of this post but it is essentially a matter of using Server Manager to add the IIS role.
I'll create a folder called "PKI" on the IIS server:


Note: we can leave the other permissions as they are.
When we install the ADCS role on PKI-Sub-CA-1, our subordinate issuing CA (next post), this process will add that server to the "Cert Publishers" group. By providing the appropriate access to the PKI share, as we have done above, we allow PKI-Sub-CA-1 to publish certificates and CRLs to this location as needed, without need for repeated manual intervention.
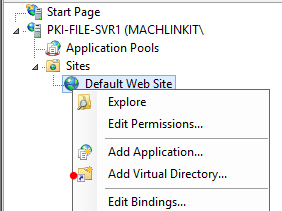
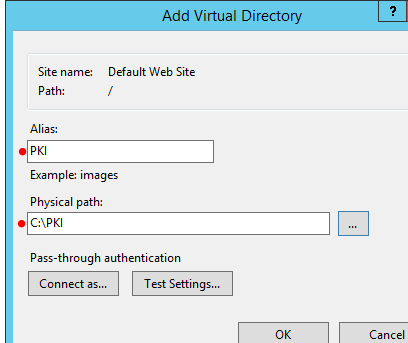
In the IIS Management Console, we then create a virtual directory and associate it with the shared folder we created earlier:
Lastly, we copy the CA root certificate and CRL into the shared folder:

The top of the screenshot shows the virtual directory in IIS and the lower part shows the two files that I have copied into the "PKI" shared folder.
***
We'll finish the configuration of the subordinate issuing CA in my next blog post.
Thank you for reading the article about PKI (Public Key Infrastructure) with ADCS, Part 5: configuration of the subordinate (issuing) CA on the blog NEW TECH If you want to disseminate this article on please list the link as the source, and if this article was helpful please bookmark this page in your web browser by pressing Ctrl + D on your keyboard keys.