
Send and Receive Connectors
We had already determined, in a previous post, that internal mail flow is functional. Users of my organization can send (and receive) mail to (and from) each other.
In fact, there are "implicit" connectors that manage mail flow that is internal to the organization. These connectors are not visible in the administrative interfaces and do not need to be configured.
Inbound and outbound mail flow (to and from the rest of the world) requires some additional configuration.
Send Connecter (outbound messages)
Outbound mail flow is the most simple. One or more "send connectors" regulate mail flow in this direction. Send connectors exist at the "organizational level" and are stored in the Active Directory configuration partition (with other Exchange related settings). In other words, send connectors are not "server-specific" and do not need to be recreated when a new server is added or in the context of a migration.
I thought I could simply send a message to an external recipient without any additional configuration. The message never arrived.
In fact, we do need to make one adjustment to the send connector: add the new server (in our case, the Exchange 2015 server) to the "source servers" attribute.
This is the procedure if we prefer the Exchange Admin Center:

In the image above, only the Exchange 2007 server (EX1) is present.
So we click on the plus sign "+" and add the Exchange 2015 server (EX13-1):

That leaves us with this:

Now I can send a test message to an external recipient.
So this single adjustment was all that was required in my environment. Other situations may be different. For example, if the firewall blocks outbound SMTP traffic except for messages sent from the existing mail server (the Exchange 2007 server, for example), another exception would have to be made for the new Exchange 2015 server.
Otherwise, if we prefer the EMS, we could use this cmdlet:
Set-SendConnector MYNET-SendConn-1 -SourceTransportServers EX13-1
However, we then loose the Exchange 2007 server (EX1):
Get-SendConnector | fl SourceTransportServers
SourceTransportServers : {EX13-1}
What happened?
The cmdlet above overwrites the existing settings and only includes the servers indicated.
If I want both servers, I have to indicate both, even if one is already indicated:
Set-SendConnector MYNET-SendConn-1 -SourceTransportServers EX13-1,EX1
Get-SendConnector | fl SourceTransportServers
SourceTransportServers : {EX13-1, ex1}
Receive Connector (inbound messages)
In previous versions of Exchange, the default Receive Connector permissions did not allow mail from anonymous senders (users from another organization, for example). It was necessary to check the appropriate box as shown below:

That is the view in the Exchange 2007 EMC. We can see these settings from the Exchange 2015 EAC as well (remember to designate the Exchange 2007 server - EX1 in my case):

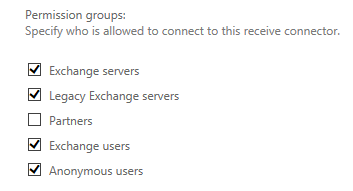
Perhaps because this default setting complicated Exchange installations for less experienced administrators (I've seen it mentioned in more than one Technet forum discussion), Microsoft enabled the equivalent setting in Exchange 2015:

Yes, the equivalent connector in Exchange 2015 is called "Default Frontend (name of server)". There are more connectors in Exchange 2015 than in Exchange 2007. However, for a default installation, we do not have to know the specific details of each connector. In fact, we do not have anything to configure here (for a default installation, once again). The server will accept inbound mail from external sources as is, since "Anonymous users" is already checked:

As mentioned previously, I was able to send test messages between users in my organization even before configuring any send or receive connectors. Before sending to and from the Internet (using a Gmail or Outlook.com account, for example), I had to adjust settings on my firewall. In particular, I had to adjust IP addresses so mail traffic would be directed to the Exchange 2015 server (EX13-1) rather than the Exchange 2007 server (EX1). I will not provide details of those changes since they would be useless for anyone using a different type of firewall.
It might also be necessary to adjust external DNS settings, expecially if Exchange 2007 and 2015 coexist for a certain time. In my case, however, I will perform a rapid migration of all the mailboxes at once, without any coexistence between the two versions of Exchange. In that case, changing the DNS records so they point to the Exchange 2015 server should be enough. Otherwise, we would still change those records BUT ALSO add a so-called "legacy" entry for the Exchange 2007 server.
So, for internal DNS, we would have something like this:
mail.mitserv.net 10.0.0.23
and...
legacy.mitserv.net 10.0.0.20
- 10.0.0.23 is the IP address of the Exchange 2015 server.
- 10.0.0.20 is the IP address of the Exchange 2007 server.
The allows Exchange to proxy or redirect connections from the Exchange 2015 server to the Exchange 2007 server, notably for users whose mailbox is still located on the older server.
We would also adjust external DNS records (hosted by our ISP or a domain name registrar) but those entries would point to the external (Internet facing) IP address of our firewall.
***
So, in summary, we ensure mail flow in and out of the organization by configuring what follows:
- Send and Receive connectors (if they are not configured correctly by default).
- Firewall settings (1 to 1 NAT in particular).
- DNS records.
For testing, we can:
- Send a message TO an external email account (Gmail, Outlook.com).
- Send a message FROM an external email account.
I have been able to do both consistently the last several days.
Thank you for reading the article about Exchange 2015 (SP1) - Migration - Part 8 - Mail flow on the blog NEW TECH If you want to disseminate this article on please list the link as the source, and if this article was helpful please bookmark this page in your web browser by pressing Ctrl + D on your keyboard keys.