Adding (and validating) a domain name to Office 365
When we sign up for Office 365, we select a domain name that by default becomes a subdomain of "onmicrosoft.com".
For example, if we take the fictional company, contoso.com, often used by Microsoft as an example in its literature, and imagine its management decides to migrate to Office 365, that would (by default, once again) give us something like this:
contoso.onmicrosoft.com
If "John Smith" is the administrator who set up the Office 365 account, he would connect using the following logon name (if his user name is john.smith):
john.smith@contoso.onmicrosoft.com
Most organizations, however, will prefer to use their own domain name, not only because it represents them, but also because it is easier to enter without having to add "onmicrosoft" each time one logs on.
We accomplish this by connecting to Office 365 and adding a domain. We also will need to prove to Microsoft that we own the domain. But one step at a time...
Add a domain
1. Logon to Office 365 using the "long" username (with "onmicrosoft.com").
Enter "login.microsoftonline.com" for the URL.
2. We then enter our username and password:
This should bring us to the "Office 365 admin center" where we can (among many other things) manage our domains. Click on "domains" to do this (left-hand side of the screen):
The instructions explain that your Office 365 accounts comes with a name like... "contoso.onmicrosoft.com" but that you can add your own domain - if you own one. If you do not, you can purchase one from a domain registrar such as Network Solutions or GoDaddy. Since I already have purchased a domain name, I'll add it to my Office 365 account:
3. Click on "Add a domain"
We'll start with the first step "Specify a domain name and confirm ownership"
4. I enter my domain name and click next.
Validate the domain (confirm ownership)
5. Select your DNS provider - if listed. Mine is not listed so I will use the general instructions.
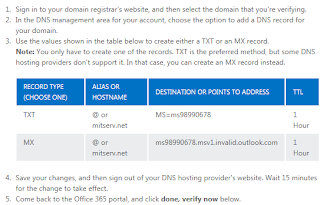
We are directed to create certain DNS records:
6. I'll create a TXT record in the management interface of my DNS provider.
Note: this step is NOT performed in Office 365 but rather using the interface of your DNS provider.
The interface will be more or less different with each provider. But in the end, it's simply a matter of creating a DNS "TXT" record.
Note: if your DNS provider does not offer a TXT record option, you can resort to the MX option. If the record is created according to MS instructions, it should have no effect on mail flow. Moreover, once validation is complete, the record can be removed. It is not intended to be functional (i.e. direct SMTP traffic) but simply allow for verification of domain name ownership.
I click on the "Verify" button toward the bottom of the screen and... in a couple seconds see that verification was successful.
Click "Finish".
Now, since I plan to migrate users with DirSync rather than creating them directly in Office 365, I will not proceed to Step 2 for the time being.
Thank you for reading the article about Exchange 2007 (SP3) - migration (staged) - Exchange Online (Office 365) - Part 3 - Domain Names on the blog NEW TECH If you want to disseminate this article on please list the link as the source, and if this article was helpful please bookmark this page in your web browser by pressing Ctrl + D on your keyboard keys.


