
There is much existing documentation on Database Availability Groups already, so my objective is not to provide information that is 100% original but rather outline the procedure that I followed to configure this form of high availability in my test network.
In its most basic form, a DAG requires two Exchange servers and at least one more server hosting the "File Share Witness". The two Exchange servers can also hold the CAS and HT roles in addition to the MBX role. In this case, however, they cannot use Windows NLB to provide high availability for the other roles. In my network, I'll use a virtual load balancer for these roles (subject of another blog post).
Network Configuration
We can either use the existing NIC on each of the two Exchange servers, configured with the usual network settings (IP address, subnet mask, default gateway and DNS servers) or add a NIC and configure the second NIC specifically for DAG replication traffic.
Yes, in a DAG, there are several types of network traffic.
- MAPI traffic = users accessing their mailbox via Outlook.
- Replication traffic = log files of a primary (active) copy of a given database being copied to the server(s) holding the passive copy of the database. In our case, there is a single passive copy. There could be up to 16 copies.
There is also "heartbeat" traffic by which the DAG members determine which partners are online and available (or not).
If we want to use separate NICs for MAPI traffic and replication traffic, we should have two NICs in each of the servers as shown in the illustration below. We can name them what we want but the names must be identical. In my case, I've named the MAPI NIC "MAPI" and the replication NIC "REPL". It makes sense to use descriptive names so you can distinguish the two NICs.

We configure the MAPI NIC as follows:
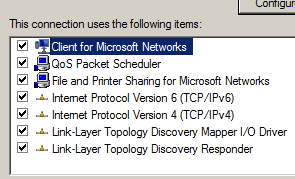

So for the MAPI NIC we leave all items checked and besides an IP address and subnet mask, we designate a default gateway and a DNS server.
Note: the IP addresses are just examples, of course.
The replication NIC is different in this respect. We uncheck the top three items and do not designate a default gateway or DNS server:


There is one more important setting not shown in the screenshot. In advanced properties, we should go to the DNS tab and uncheck this option:
"Register this connection’s addresses in DNS"
Lastly, we should adjust the "binding order" so the MAPI NIC is above the replication NIC:

Note: among the menu options (File, Edit, View...) there should be an "Advanced" option. Select this and then "Advanced Settings". Press on Alt if these menu options do not appear toward the upper left corner of the window.
One word on IPv6.
My research leads me to believe that it should remain enabled on both NICs. I believe this is the current Microsoft recommendation. In the past, it seems that there were problems with IPv6 in Exchange 2007 (?) and disabling it was the solution. Any such problems should have been corrected since. On the other hand, I have read several sources that caution against disabling IPv6, especially when installing Exchange 2010.
If it is necessary to disable IPv6, it is not enough to uncheck the item in the NIC properties. The administrator must also disable it in the registry. Please consult the appropriate documentation online if you determine that this option is necessary.
Database paths
They must be identical on each of the DAG members. So if the database to be added to the DAG is located at C:\DB1\DB1.edb on DAG server 1, the same path must be used on DAG server 2 (and 3, etc.). In fact, outside a test environment, we would probably never store the mailbox databases on the same volume as the operating system.
Here is an example of how we could set the database paths identically on both servers:

Note: the "A" is there simply so these folders remain at the top of the folder list.
I have already created a database (with associated log files) on EX13-1. Later, we'll add that to the DAG.
File Share Witness (FSW)
Ideally, an additional HT server would be designated and in that case, no further configuration would be necessary. Since we are using a simple file server, we must add the "Exchange Trusted Subsystem" group to the local Administrators group of the file server.
Note: on a member server, we do this in "Computer Management".

Create the DAG
We can use the EMC or the EMS to create the DAG. I will use the latter.
There are three major steps in the creation of a DAG:
- The creation of the DAG itself
- Adding mailbox servers to the DAG
- Selecting mailbox databases that will be part of the DAG
So I'll start by creating the DAG itself.
I thought that all was ready but when I execute the following command...
[PS] C:\>New-DatabaseAvailabilityGroup -Name DAG1 -WitnessServer FSW1.mynet.lan -WitnessDirectory C:\FSW -DatabaseAvailabilityGroupIpAddresses 10.0.0.25
I already encounter an error:
WARNING: Unable to access file shares on witness server 'FSW1.mynet.lan'. Until this problem is corrected, the database availability group may be more vulnerable to failures. You can use the Set-DatabaseAvailabilityGroup cmdlet to try the operation again. Error: The network path was not found. The DAG is created but without the FSW. This must be corrected.
First, I know:
- I have added the Exchange Trusted Subsystem to the local administrators group
- I have added the File Server role.
However, observing the Windows Advanced Firewall settings, I note that none of the File Share rules are enabled.
We can enable them in at least two ways. In the basic Windows Firewall settings (Control panel), enable File and Printer Sharing or simply share a folder. I share an test folder and note that this action enables the File Server rules, notably those for SMB.
I could remove the DAG and start all over but this incident provides the opportunity to configure the FSW with the Set-DatabaseAvailability cmdlet:
[PS] C:\>Set-DatabaseAvailabilityGroup DAG1 -WitnessServer FSW1.mynet.lan -WitnessDirectory C:\FSW_DAG1
Even though the cmdlet completes successfully (no errors), the share may not appear immediately. Usually, we have to wait until servers are added.
Second, I have to add the mailbox servers that will be members of the DAG.
I encountered an error here as well, due to communication problems with the FSW server. For the sake of concision, I will not post all the troubleshooting. In the end, I had to execute this command on the FSW server:
PS C:\> Enable-PSRemoting
This is more or less the equivalent of the command winrm quickconfig and accomplishes the following:
1. Starting or restarting (if already started) the WinRM service
2. Setting the WinRM service type to auto start
3. Creating a listener to accept requests on any IP address
4. Enabling firewall exception for WS-Management traffic (for http only).
In any case, this allowed me to add servers to the DAG with these cmdlets:
PS] C:\>Add-DatabaseAvailabilityGroupServer DAG1 -MailboxServer EX13-1
[PS] C:\>Add-DatabaseAvailabilityGroupServer DAG1 -MailboxServer EX13-2
Finally, I can designate a mailbox database to be part of the DAG. This translates into the creation of a second copy of the database on the second server. Mailbox database "DB1" already exists on server EX13-1 where I created it. With the following cmdlet, a second copy will be created on server EX13-2:
[PS] C:\>Add-MailboxDatabaseCopy DB1 -MailboxServer EX13-2 -ActivationPreference 2
So we add a copy of mailbox database DB1 to mailbox server EX13-2 with an activation preference of 2. This means that the database will be active on EX13-1 unless something happens, in which case it will become active on EX13-2. If we have more DAG servers, the activation preference could be higher (3, 4, 5 ,etc.).
This concludes my first blog post on Database Availability Groups.
Thank you for reading the article about Exchange 2010 - DAG (Database Availability Group) - Part 1 - Configuration (initial) on the blog NEW TECH If you want to disseminate this article on please list the link as the source, and if this article was helpful please bookmark this page in your web browser by pressing Ctrl + D on your keyboard keys.