
The DAG is only part of high availability. It only provides this functionality to the mailbox (MB or MBX) server role. We must use other methods to provide high availability for the Client Access (CA or CAS) and Hub Transport (HT) roles.
The recommended option is to use a "load balancer". Besides distributing the load between two or more Exchange servers, it is "aware" of the availability (or non-availability) of the Exchange services (HTTPS, SMTP) and can redirect clients to another server as needed.
Let's imagine we have two servers with the CA, HT and MB roles: Svr1 and Svr2. These two servers are part of a DAG. If Svr1 holds an active copy of a database (that is part of the DAG) and if the server fails, the passive copy of the database on Svr2 will become active.
But what about client access?
How will clients connected to Svr1 know where to reconnect? And what about new clients that have yet to connect? How will they know to connect to Svr2 instead of Svr1?
The load balancer takes the "pulse" of the Exchange servers and when one fails, it directs new clients to the other server (Svr2 in our case) and redirects current clients to the other server as well.
Let's try to see how this functions in reality.
The KEMP VLM-200 virtual load balancer
I'll use a KEMP VLM-200 installed in ESXi 5.1. The installation of the VLM (not to mention the installation of ESXi) is beyond the scope of this post. However, I will say, in summary, that it is a matter of downloading a file from the KEMP website (that's www.kemptechnologies.com - not just kemp.com) and importing the .ovf file in ESXi. Rest assured, if you prefer Hyper-V, there is a version for this hypervisor and some others as well.
When we start the VLM-200 in ESXi, there's a bunch of command line information that displays and then a command prompt. The device can probably be configured at the command line but there is a much more user-friendly web interface. The IP address (DHCP assigned) is indicated among the command line information.
Note: use the DHCP assigned IP address indicated to connect to the web interface.
I want to concentrate on the configuration and use of the load balancer for Exchange so I'll go quickly here. If you want to use a KEMP load balancer I would recommned you contact them for assistance. In any case, you will have to contact them for a license. You cannot go beyond the "home page" without one. Once the license is entered (there are various options for this: online, offline, legacy... I will not detail them all here), we are prompted to logon and change our password.
Notes:
- You can request a 30 day trial license.
- The default username and password were provided by KEMP in an email.
Now I'm in and can start the configuration.
I'm most interested in the first Ethernet interface (eth0), the hostname, the DNS configuration and the default gateway. We can see these options on the menu to the left.

This is where you would configure the IP address of the first network interface (eth0):

I'll make the IP address 10.0.0.27 with a /8 or 255.0.0.0 subnet mask.
This is the IP address I will use from now on to access and configure the virtual load balancer.
Note: the connection uses HTTPS (port 443) so remember to type the URL like this:
https://10.0.0.27
If you are prompted about the web site's certificate not being trusted, you can ignore the warning - at least for the time being.
Templates for Exchange 2010
I could attempt to configure the VLM-200 for Exchange manually, setting by setting.
Fortunately, there are templates that prepare much of the configuration behind the scenes.
Just as we downloaded the virtual image for the VLM-200 from the KEMP technologies website, we can download templates that facilitate the configuration of Exchange 2010, of Exchange 2015 and a multitude of other server applications.
So I download the template for Exchange 2010 (contact support if you need assistance locating these templates - I found them in the Resources | Documentation section).
Note: the name of the template file is "Exchange2010Core.tmpl".
To import the template, we go to the "Manage Templates" link on the menu to the left (under Virtual Services):

We then browse to the downloaded template and import:

Now we have the following templates to work with:
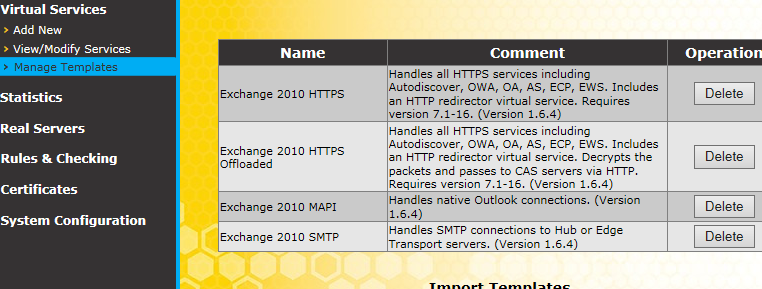
Yes, that may be difficult to read. So I'll indicate the names of the templates here:
- Exchange 2010 HTTPS: for access methods using HTTPS (autodiscover, OWA, Outlook Anywhere, ActiveSync, EWS, ECP).
- Exchange 2010 HTTPS Offloaded: same as above except SSL connections terminate at the load balancer, Essentially, the load balancer manages SSL encryption of client connections and can, optionally, re-encrypt connections to the Exchange servers.
- Exchange 2010 MAPI: these are Outlook connections.
- Exchange 2010 SMTP: this is mail traffic to and from the Hub Transport servers (that may also hold other roles as well).
Configuration of services
In fact, we have to accomplish two tasks:
- Direct client access and hub transport traffic to the appropriate load balancer IP address (some services may have a distinct IP address) either with the IP address itself or via DNS. In particular, we want to point the CAS Array DNS record to an IP address of the load balancer. Incoming SMTP traffic should also be directed to the load balancer.
- Configure the services themselves (HTTPS access, MAPI access, SMTP traffic). We can do this manually or use the templates mentioned earlier. I will use the templates. At this time, we will designate the Exchange 2010 servers to which the load balancer will forward client access connections and SMTP traffic
Hub Transport (SMTP)
First, I'll configure high availability for the Hub Transport rule.
I'll start from the exterior (perimeter firewall) - and finish with the SMTP service configuration.
Inbound SMTP traffic is directed to my perimeter firewall using the MX and A records configured in what I will call "external DNS". We would manage this in the interface provided by our domain registrar or possibly a service like NO-IP. In my case, this has already been configured, like this:
- The MX records points to the A record.
- The A record points to the external IP address of my firewall.
The firewall performs what is known as "1 to 1 NAT" which redirects SMTP traffic for the external IP address of my firewall to the internal IP address of one of the Hub Transport (HT) servers.
So now we have to adjust the 1 to 1 NAT settings in the firewall so SMTP traffic is directed to the IP address of the load balancer instead of the IP address of one of the HT servers.
I have a Cisco ASA 5500 series firewall. The procedure would be similar, but not identical, on other devices. We have several choices for the interface: CLI (command line), ASDM (ASA Security Device Manager) or even CSM (Cisco Security Manager). I will use the ASDM (GUI) interface.
Note: I will simply show how to adjust the existing 1 to 1 NAT rule (and not how to configure new 1 to 1 NAT rules).
In the Cisco ASA, we create "NAT Rules" (and "Access Rules" for that matter) with "Network Objects". In my case, I have a network object that represents the current target for SMTP traffic, one of the Exchange 2010 servers with IP address 10.0.0.23. I'll edit the network object so the IP address to which SMTP traffic is directed now designates the load balancer :
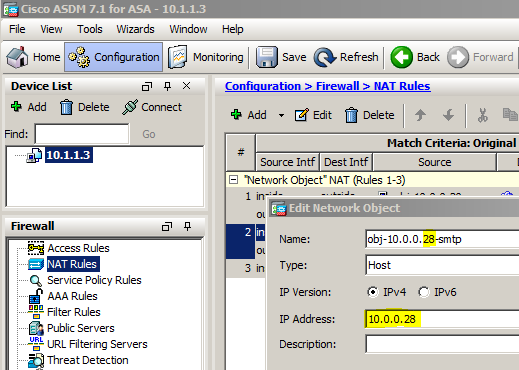
10.0.0.28? Not 10.0.0.27?
Besides the IP address of the physical interface(s), load balancers usually have several "virtual IP addresses" (VIP) that correspond with the "virtual services" provided. Each service has an unique IP address / port combination.
In my network, 10.0.0.28 (port 25) is the VIP that I will configure for the SMTP service.
Next, we'll configure the SMTP service.
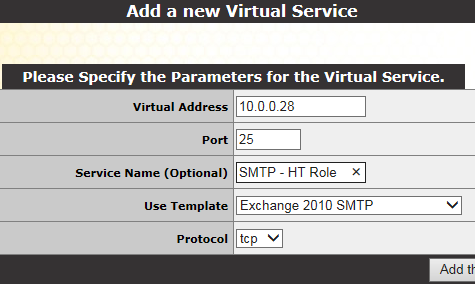
At the Main Menu, we navigate to "Virtual Services" and then "Add New":

Some comments....
- The virtual (IP) address is 10.0.0.28.
- The port is 25 (for SMTP - with TCP for the protocol).
- The service name is optional but I'll call it "SMTP - HT role".
- Among the templates imported previously, I'll select the "Exchange 2010 SMTP" template.
This configures the appropriate settings automatically.
We still need to designate the "real servers", in our case the Exchange 2010 Hub Transport servers for which we are load-balancing.
On the same page, there are a number of other sections (that we do not need to explore for basic configuration) and then "Real Servers". We configure them as follows:
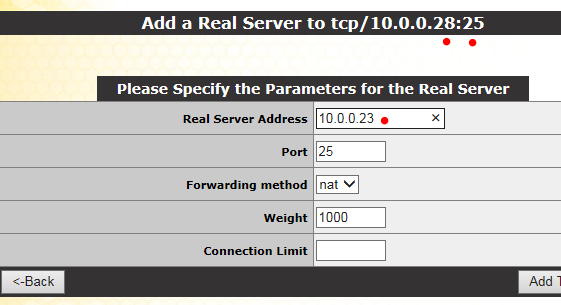
Once again, for basic functionality, we can use the settings shown above (some may be default settings and already present). In my case, I enter the IP address of my first Exchange 2010 server (EX13-1) - 10.0.0.23 - and then (screenshot not shown) for the second Exchange 2010 server, 10.0.0.24.
Client Access (Outlook - MAPI)
For Client Access, we would configure the ASA 5500 as above, except that we would modify the rule for HTTPS (port 443). This would cover services such as OWA, Outlook Anywhere and ActiveSync.
As for Outlook, we need to adjust the DNS record for the CAS Array. Until now, that DNS record pointed to EX13-1, one of the Exchange 2010 servers, at IP address 10.0.0.23. I need to change the record so it points to the load balancer:
As for Outlook, we need to adjust the DNS record for the CAS Array. Until now, that DNS record pointed to EX13-1, one of the Exchange 2010 servers, at IP address 10.0.0.23. I need to change the record so it points to the load balancer:
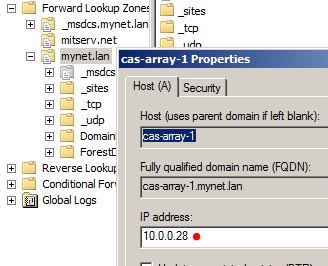
As for the MAPI service, we would select the "Exchange 2010 MAPI" template and configure the settings as follows:
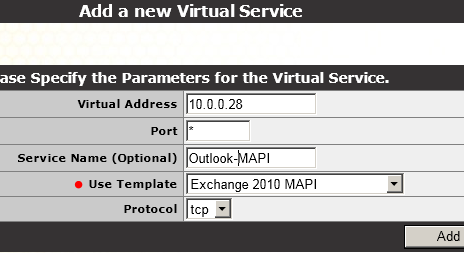
We would then indicate the "real servers" as we did for the SMTP service.
Lastly, in my case, we would configure the Exchange 2010 HTTPS service as we did for the two previous services except that we would choose the corresponding "Exchange 2010 HTTPS" template and use port 443. We can use the same IP address since the port is different from port 25 (SMTP) and port * (MAPI).
Note: why not port 135? I'm not sure. If I recall correctly, that is how the template configured the service.
Note: why not port 135? I'm not sure. If I recall correctly, that is how the template configured the service.
***
I realize my post does not cover all aspects of the configuration of a VLM-200 load balancer and does not demonstrate each procedure in step-by-step detail. It was meant as a overview with screenshots illustrating some of the key points. Morever, it does not address more advanced subjects such as SSL offloading or the different types of affinity.
For those interested in more details, or perhaps other perspectives on the KEMP load balancers, I would consult the sources below. Andy Grogan and Paul Cunningham have presented the KEMP VLM-100 which is an earlier version of the VLM-200 load balancer:
http://www.telnetport25.com/2012/06/review-of-the-kemp-technologies-loadmaster-vlm-1000/
http://exchangeserverpro.com/kemp-vlm-100-exchange-2010-load-balancer/
You can also register at the KEMP website to access documentation and watch instructional videos.
Thank you for reading the article about Exchange 2010 - High Availability - Client Access and Hub Transport roles - example of the KEMP VLM-200 on the blog NEW TECH If you want to disseminate this article on please list the link as the source, and if this article was helpful please bookmark this page in your web browser by pressing Ctrl + D on your keyboard keys.