
After several posts about an Exchange 2007 to 2015 migration, migrating from 2007 to 2010 may seem like a step backwards. While migrations to 2010 are probably less common, now that Exchange 2015 is available (recently with SP1), they are an option, notably in the Exchange Server Deployment Assistant (online preparation guide).
In fact, I will use this tool as a general guide and will state my migration framework from the start:
- We have a single Active Directory domain (and thus forest) and a single site.
- There is no Edge Server.
- There are some Public Folders but since their use will cease, there is no need to migrate them.
Since much documentation already exists on Exchange 2010 migrations, my posts will only cover the elements existing in my test environment (itself reflecting a production environment with which I have become involved). So, if I do not consider Public Folders, for example, it is not so much to avoid more complex migration scenarios, but rather to concentrate on the aspects I'll really have to manage "in the field".
The exact migration will be from Exchange 2007 SP3 RU13 to Exchange 2010 SP3 RU6.
Preliminary considerations - Active Directory preparation
Active Directory environment
I will only summarize the Active Directory requirements here (for full details please consult the Exchange Server Deployment Assistant and related links).
- The Forest Functional Level (or mode) must be at Windows 2003 or above.
- The Schema Master must run at least Windows 2003 SP2 (standard or enterprise, 32 bit or 64 bit - that does not matter).
- Domain controllers in general must run at least Windows 2003 SP2.
- In every site where Exchange will be installed, there must be a global catalog server running at least Windows 2003 SP2.
My test domain controller is a Windows 2008 R2 SP1 server.
My Forest Functional level is Windows 2008 R2.
Administrative rights
The account used for the operations to follow must be a member of the domain, enterprise and schema administrators groups. It is also a member of the Exchange Organization Management group. Note that membership in the domain admins group makes the account a member of the local administrators group on all member servers. After the upgrade (or extension) of the Active Directory schema, we can remove the account from the schema administrators group (membership in it is only useful for this operation).
Exchange server hardware and operating system
Note: the server must become a "domain member" (be added to the domain) before the actions taken below (some features could be added before domain membership but I recommend making it a domain member from the very start).
Once again, consult the Exchange Server Deployment Assistant for the various possible scenarios (single or multi-role servers).
In summary, we need:
- A 64 bit operating system (Exchange 2010 is 64 bit only) - either Windows 2008 SP2, Windows 2008 R2 or Windows 2012 (SP3 is required for Windows 2012). Standard version is acceptable unless we want to use Database Availability Groups (DAGs). In that case, we must use the Enterprise version of Windows server (the Enterprise version of Exchange is not necessary for a DAG).
- Windows 7 SP1 for the Exchange Management Tools.
- Memory requirements vary based on roles. 4 GB is minimal for production. 8 GB is better. Some environments may require more memory.
- Storage: any current hard drive will have sufficient space. RAID arrays for the OS, log files and databases are preferred for fault tolerance. Larger environments will most likely use SAN storage, far beyond the scope of this post.
- Client support: Outlook 2007, 2010, 2015, IE 7 to 11 (for OWA premium client).
The above is a simple summary. For a complete (and updated) list of compatible clients, please consult the Exchange Server Supportability Matrix:
Exchange Server Supportability Matrix
Preparation of Active Directory (schema extension)
We need to prepare Active Directory, the schema in particular, for Exchange 2010 SP3. My preferred method is to place the Exchange 2010 SP3 install files (downloaded from Microsoft and extracted) in a folder on the future Exchange server. We then execute a number of setup commands (two, in a single forest/domain scenario). These commands are presented in greater detail below.
Note: make sure that the server is already a member of the domain.
While the procedure usually succeeds without a problem, it is wise to backup the system state of the schema master before. It is also advisable to verify Active Directory health and ensure that replication is functional, since the changes to the schema (and Active Directory in general) will have to replicate to the other domain controllers.
I would run:
- DCDIAG (various "switches" are possible here - please consult the documentation).
- REPADMIN /replsum
- REPADMIN /showrepl
I could even force replication with the repadmin commands or in Active Directory Sites and Services.
Since I am running Windows 2008 R2 (SP1) for my domain controller, I also have the option of using the Active Directory Domain Services Best Practices Analyzer (which can be found in Server Manager - under the ADDS section, click on "Scan this Role" among the options to the right).
Each administrator will have to analyze the results of the tools above on a case by case basis. The mulitude of possible results that could be obtained, and the measures to take, are beyond the scope of this post.
Once we have ensured that the Active Directory environment is healthy, and replication in particular, we can prepare the schema.
***
PS C:\> Add-WindowsFeature RSAT-ADDS
PS C:\> Add-WindowsFeature NET-Framework
Note: there are other required features that we will install later. The two above are necessary for the schema extension and general preparation of Active Directory for Exchange 2010 SP3.
Next, we navigate to the location of the Exchange setup files and execute the following two commands:
PS C:\Exchange 2010 Project\E2K10SP3> .\setup /ps
PS C:\Exchange 2010 Project\E2K10SP3> .\setup /p
There will be a confirmation prompt (if you want to stop, press any key) and various information displays on screen as the schema upgrade / Active Directory preparation progresses. If all goes well, this message should display after each of the operations:
"The Microsoft Exchange Server setup operation completed successfully."
Some notes:
- Of course, the location and the name of the folder containing the Exchange setup files will vary.
- We must execute the commands in Powershell (not the simple command line interface).
- We must precede the setup command with .\
- /ps is an abbreviated form of prepareSchema (we can use that as well).
- /p is an abbreviated form of prepareAD.
- If we have multiple domains, we will have to run additional commands in each of those domains.
***
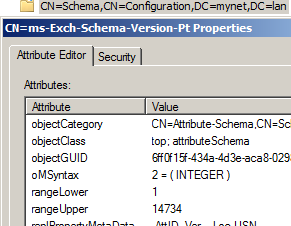
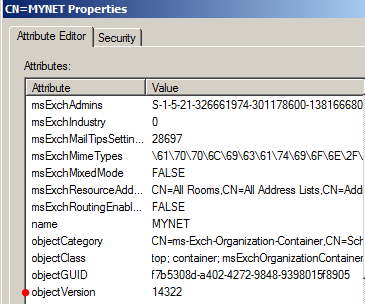
It can be useful to compare the schema levels before and after (if the numbers do not change to the proper level, that would indicate a problem). There are in fact several values to verify.
Before the schema upgrade, the "Forest (rangeUpper)" value should be 14625 and the "Forest (objectVersion)" should be 11222.
We can observe these values with ADSIEdit, looking at the following attributes in the following locations:
CN=ms-Exch-Schema-Version-Pt,CN=Schema,CN=Configuration,DC=mynet,DC=lan

CN=MYNET,CN=Microsoft Exchange,CN=Services,CN=Configuration,DC=mynet,DC=lan

Note: right-click on the folder to view the properties. We can filter the results so only attributes with values are displayed.
After the schema upgrade, the "Forest (rangeUpper)" value should be 14734 and the "Forest (objectVersion)" should be 14322:.
***
Prerequisites: features, hotfixes and "other software"
Features
The features to install depend on the roles of the server. My "multirole" server will have the Client Access, Hub Transport and Mailbox roles installed. Other combinations are possible. For these other combinations, please consult the Exchange Server Deployment Assistant and related links.
There is a script for this - so we do not have to check every single box manually in the "Features" section of Server Manager - or type every single feature if we opt for the command line (Add-WindowsFeature followed by the name of all the necessary features).
This is the script for a server with the Client Access, Hub Transport and Mailbox roles:
Add-WindowsFeature NET-Framework,RSAT-ADDS,Web-Server,Web-Basic-Auth,Web-Windows-Auth,Web-Metabase,Web-Net-Ext,Web-Lgcy-Mgmt-Console,WAS-Process-Model,RSAT-Web-Server,Web-ISAPI-Ext,Web-ISAPI-Filter,Web-Digest-Auth,Web-Dyn-Compression,Web-WMI,Web-Asp-Net,NET-HTTP-Activation,RPC-Over-HTTP-Proxy –Restart
Yes, one can copy and paste that text into the Powershell console.
Note: I opted to execute the "setup" commands for schema and general Active Directory preparation. This required the installation of .NET Framework 3.5.1 and related features. So some features were installed before executing the script.
There is one more small script to run afterwards:
Set-Service NetTcpPortSharing -StartupType Automatic
As you probably can see, this sets the start type of the NetTCPPortSharing service to automatic.
Hotfixes
The number of hotifxes to install depends on the operating system. Windows 2008 R2 with SP1 only requires one of the hotfixes mentioned for Windows 2008 R2 (without SP1) : KB2550886
The file name was: Windows6.1-KB2550886-x64
This is a hotfix for the Cluster Service.
Other software
Office 2010 Filter Pack
In particular, I used a file named "FilterPack64bitv2".
These filters are used on Mailbox and Hub Transport servers (the CAS role does not require them). The Mailbox role uses them for the indexation of email attachments and discovery searches. The transport rules configured on HubTransport servers use the filters to scan attachments.
***
Once all the prerequisites are installed, we can install Exchange 2010 itself.
We can use either the GUI, clicking "Next" as needed, or the command line. I'll use the second option here.
This command should suffice:
PS C:\E2K10SP3> .\setup.com /r:"c,h,m" /ExternalCASServerDomain:mail.mitserv.net
Note: we have to navigate to the location of the installation files. We can indicate "setup.com" or simply enter "setup". Either will work.
At this point, I installed Rollup 6 for Exchange 2010 SP3 as well as Windows updates in general.
This concludes the preparation for and the installation of Exchange 2010 SP3 (RU6).
Thank you for reading the article about Exchange 2010 (SP3) - Migration - Part 1 - Introduction, Prerequisites and Installation on the blog NEW TECH If you want to disseminate this article on please list the link as the source, and if this article was helpful please bookmark this page in your web browser by pressing Ctrl + D on your keyboard keys.